Trace
The Trace is the surrounding bracket that holds the zone, the device fleet, the profile and the notification together. This monitoring then determines whether and which alarms result in a notification, who is notified and whether there are also escalations.
Create different traces for different monitoring and alerting scenarios. Each trace can be activated or deactivated; several traces can also be active at the same time and the same or an overlapping number of your devices may be monitored in the various traces.
To create a new trace, click on the “+” symbol in the “Trace” or “Monitoring” menu. Existing traces can also be changed here.
Overview
All current traces are displayed as lines in the overview. In this display it is possible to see whether the alarm (1 tick  ) or escalation (double tick) is active or not. Clicking on the globe
  opens the map. Click on the name to open the settings.
Details
Each trace must have a name and can also have an optional description. Use this if you create different traces so that you can recognise later why you created the trace.
You can specify the data for monitoring in the upper area of the trace:
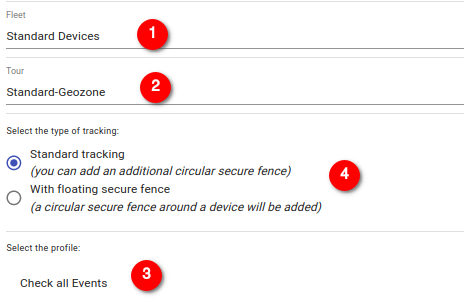
- select the fleet to be monitored from the list.
- select the Zone to be linked to the monitoring from the list. In the list there is a fixed entry The whole world which can be used if no special zones are defined. This zone corresponds to a world in which there are only safe zones.
- a profile must be selected in the profile list which contains the alarm functions.
- tracking type
- in the standard case, the devices are monitored using the specified Zone. It is possible to define an ad-hoc security zone in the monitoring view; however, this is usually not required as the zones are often fixed and already coded in the Zone.
- if a Floating Fence is selected, you must also select a device and a radius for a perimeter. This device then creates a safety zone. Use this feature, for example, to be alerted by a ship if the dinghies move too far away.
Alarms
While the supported alarm functions are defined in the profile, the trace is used to link such alarms with notifications. To do this, create a notification matrix and select the corresponding nodes:
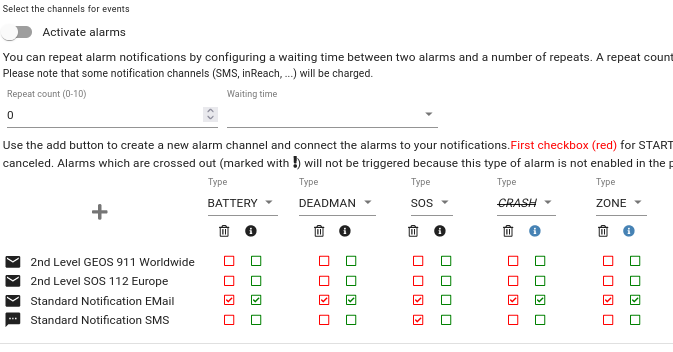
The alarms are activated with the Alarms switch. The trace is only active when the alarm is switched on. Alarms are then sent to the corresponding channels. If alarms are to be sent repeatedly, this repetition can be specified, including a waiting time between repetitions.
The alarm matrix consists of a row for each notification and dynamic columns that can be added using the “+” symbol. Each column represents an alarm that can be generated with the profile. If the alarm is deactivated in the profile, it is crossed out in the matrix.
It is possible to configure several columns for one and the same alarm at any time. The clock symbol  can be used to set a time limit for each alarm type.
An alarm can also be signalled on the device itself as feedback via the  feedback (not possible with SmartSole/SafeSole)
Operation on the device
Depending on the end device, alarms can be cancelled by various actions on the device:
- If the device has an SOS-CANCEL button or action, you can use it to end all alarms. If you have set the MUTE function in the profile, no more automated alarms will be triggered for the specified time
- If the device has START/STOP buttons, you can end almost all alarms with the STOP action; only the manually triggered SOS alarms must still be ended with CANCEL. Please note that this also puts you in pause mode, i.e. no new alarms are activated until you press START again
- If the device has the option of starting a PAUSE, almost all alarms are also cancelled (except SOS). In contrast to STOP, the Alive, for example, continues to send tracking data to our system so that the pause mode can be ended automatically by leaving a pause zone (this is not necessarily the case with STOP.)
- If the device also sends POWER-ON/OFF events, you can also simply switch off the device to end all alarms (including SOS).
Please note your settings in the profile for the PAUSE function. If you set the device to automatically switch to pause mode if it has not moved for a while, this can cause the alarms to be cancelled unintentionally.
Escalations
SmartSafety supports a two-stage alarm model. The first stage of alerting occurs when one of the alert functions in the profile strikes. This alarm can then be assigned to a notification via the alarm matrix.
An alarm remains open until the reason for the alarm no longer exists. For example, an SOS is valid until the device sends a CANCEL. In the case of automatic alarms, however, the server must terminate them. For example, in the case of a ZONE alarm, the device must transmit a new position for this alarm to be cancelled.
However, if an alarm remains open, the second stage of the alarm can take place, this is called Escalation.
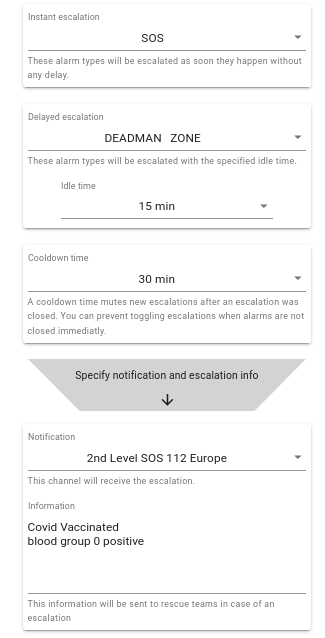
The escalation configuration distinguishes between Instant and Delayed escalations. The alarms configured in the Instant escalation field will immediately trigger escalation processing as soon as this alarm occurs.
In contrast, Delayed escalations are executed with a delay; the delay time is defined in the Idle time list. Only when a Delayed alarm has been active for this period of time is this alarm escalated.
Each escalation has a Cooldown time, i.e. once an escalation has ended, no new escalation is started during this period. A user can always end an escalation with a CANCEL event; such an event is therefore a signal to a rescue unit that everything is OK. However, alarms may remain open (e.g. a ZONE alarm will always remain open or reopen as long as the position does not change). A cooldown therefore makes it possible to end an escalation even though the alarm is still not closed.
!!! info If the alarm situation is not fundamentally changed, the escalation is reopened after the cooldown time.
Finally, the escalation contains additional information as free text as well as the notification channel to be used. The list also contains an entry for Focuspoint International, but this can lead to an error message:
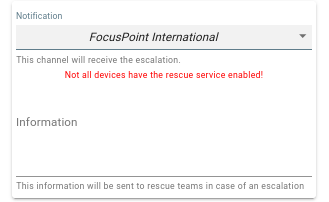
In such a case, you must have your devices activated for Focuspoint rescue. Please contact us for this.